Wednesday 27 April 2011

Self Belief!

I have a beautiful display of reticulated iris beginning to burst forth in the garden, so I have been keeping my eye on them ready to do a painting. I am generally ok with specimen flower painting, but wanted to have a go at something a bit more complex, with lots of blooms growing together, in the style of the foxgloves, agapanthus, tulips etc that I have posted previously.
In order to get my head around it, I was perusing a couple of inspirational books of what the editors chose as some of the worlds best flower painters (The Best of Flower Paintings Vols 1 and 2, edited by Kathryn Kipp and Rachel Wolf respectively, published by Cassell- Northern Light Books) .Partly reading the info and partly looking at the paintings in a fairly random fashion, I was appalled to read that one artist, Airi Foote, had been curtly informed by a tutor that she had no talent! So discouraged by this remark, she gave up painting, and turned instead to gardening. She eventually decided that talent or no talent, she was going to try again and to hell with what anyone thought. She ends up in a book about  the worlds best flower painters. Although her painting is not really spectacular for me, it did make me think about how much these experts, so say, really know, how subjective enjoyment of visual images is, and how careful we have to be when talking about other peoples work.My Art Teacher at school was much more kindly and informed my parents at an annual assessment meeting, that I had trouble knowing which end of the paintbrush to use! Thank goodness that did not put me off.
 What I did like about the painting, and what caught my eye in the first place, was the combination of colours used in the leaves and background. Not colours I regularly use, so I thought, give them a go.

                                            White Roses by Airi Foote  11'' x 14''

She talks about using a combination of such colours as Permanent Rose, Winsor Violet and under painting with Aureolin Yellow to give it a glow.
I dug through my mountain of photos from my garden, and found something in a similar style to her source material and using my favourite Fabriano Extra White did the basic drawing.


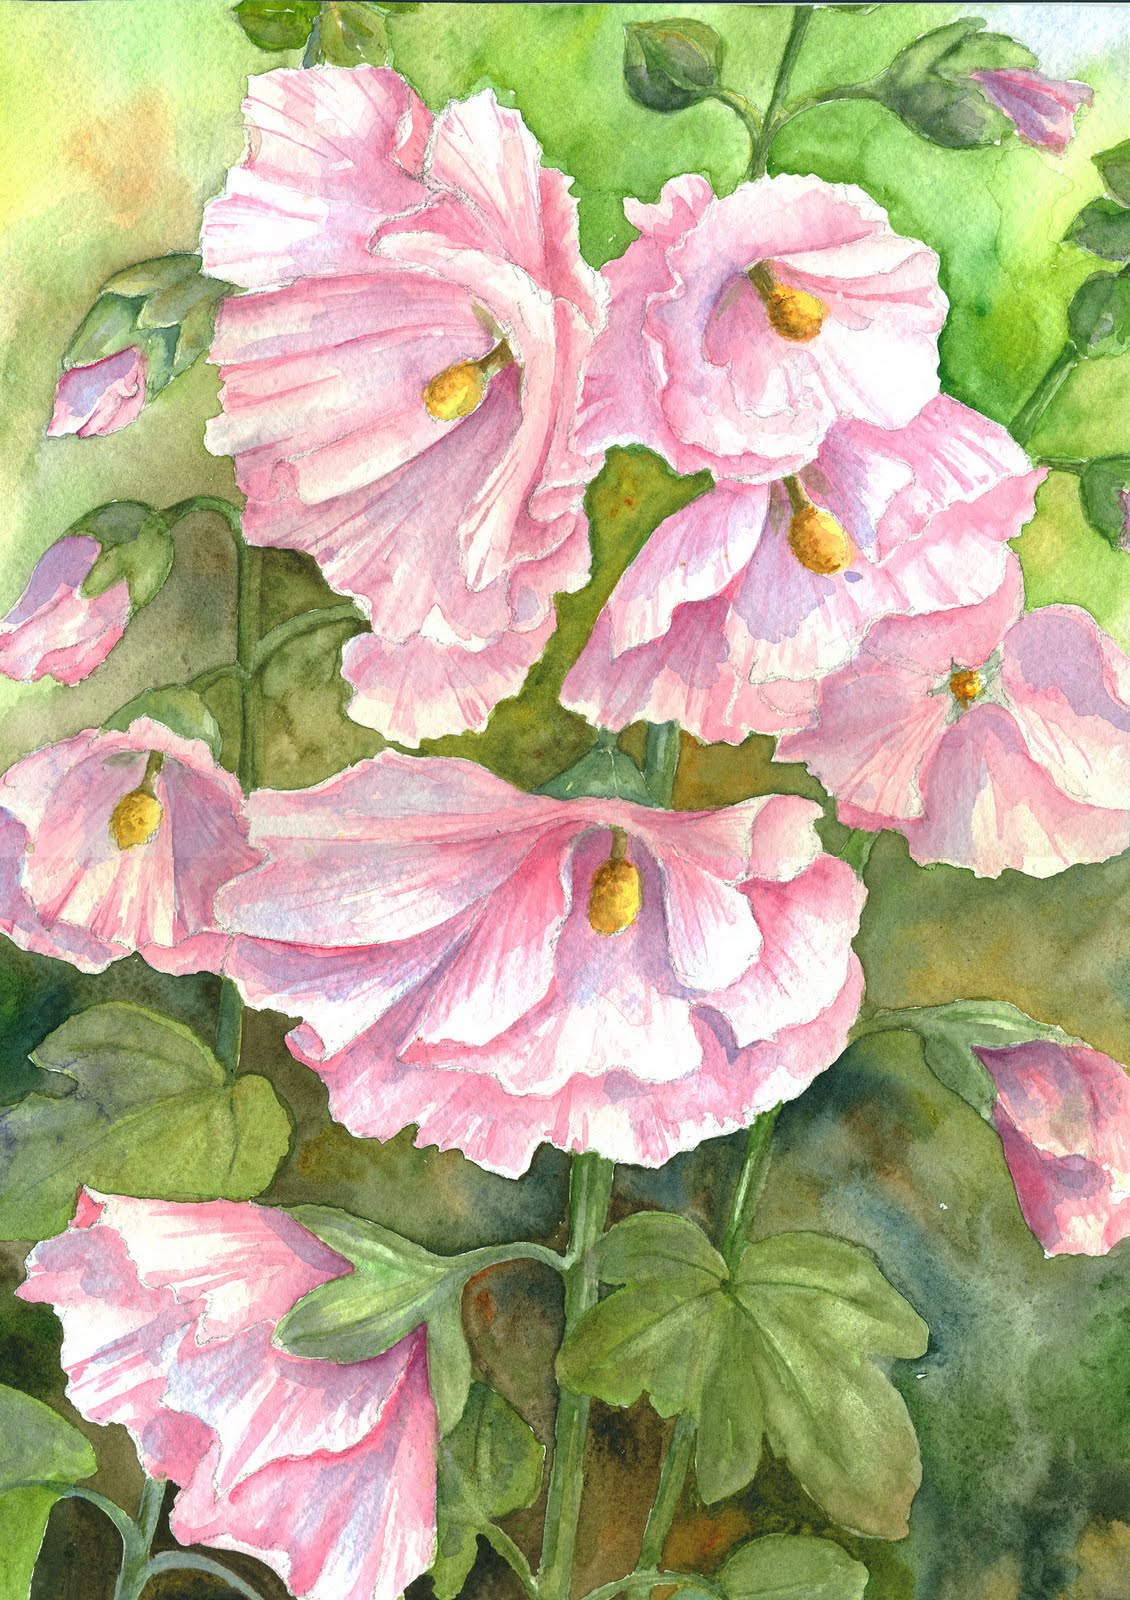
This is one of my favourite roses that regularly do well in my clay soil, so I have used them quite frequently for paintings and have been pleased with the outcomes. I tried to paint with a mixture of her suggested colours and some of my favourite ones including quinacridone violet, quinacridone rust and transparent orange iron oxide, all of which are from the M Graham and Co range. These paints have a lovely texture, moist and easy to put into empty pans, where they do not dry out to any degree, and they have a lovely glow to them. They can be quite staining, so cannot easily be lifted if used in the concentrated form, but I love them.
I did try to keep away from too much traditional green in the leaves and I tried to keep my background lighter than I might normally paint around white flowers and the result is ok.

In hindsight, I would have changed the composition slightly and had a couple of the flowers overlapping to make the painting hang together better, but nothing I can do about that now,what is done is done!


                                           'White Roses' Watercolour on Fabriano Extra White
                                           paper. 9'' x 13''

I hope that the use of Airi's work from this book comes under the heading of 'Review' and conforms to the 'brief passages' that any reviewer is allowed to use.

Saturday 16 April 2011

Which comes first?

'Rhododendrons'
  Watercolour on Fabriano Extra White 300gms  48x33cms


One of the questions I get asked most about my work is which do I do first; the subject or the background. I have to say, in all honesty, that there is no hard and fast rule and I can paint a piece of work either way.
When I was starting this painting, I did give it some thought and realised that it was not as random as I might think, and there are factors which influence the way I proceed.
My backgrounds are deliberately very loose and produced with a great deal of water and wet-in-wet painting. I do it this way to help counteract the formality of the subject which can be painted quite tightly ( not something I necessarily want to achieve, but that's just the way they come out). They are therefore quite spontaneous, and do not take too long to add to the work, but they can be quite hit and miss. So, the rule of thumb tends to be the more complex the flowers, the more likely I am to do the background first. I do not want to spend hours painting the flowers and then to mess up the background. Simple flowers are painted first and the background added afterwards to give them some contrast.  White flowers often have their backgrounds painted first as this helps to define their shapes within the picture.
Having said all that, these complex rhododendrons, almost white should have had the background done first, but contrary to all I have just said, I did in fact paint the flowers first. I cannot give a reason for this, it is just the way it progressed.
I am really glad I did it this way. I did a detailed drawing taken form a couple of snaps of the flowers in my garden, making sure that the sun was in the right direction in both photos.


I painted the two main blooms, and realised that the composition was unbalanced, so to rectify this, I added, from another snap I had, a large bud to the right hand top corner. (The leaf coming from this bud towards the right could have been a little better placed as it tends to skim the top of the upper right trumpet.)
My reason for pointing this out is that had I painted the background first, I would not have been able to make these adjustments and the painting would have been that much weaker.
Another point in favour of painting the background last, is that I do like to include some of the flower colours in the background to link the two elements together, but it also helps to give the impression of other blooms behind the main elements.
So there we have it. 'Rhododendrons' ....flowers first, background last.

Monday 11 April 2011

Mounting a Painting

I have been having a look at my blogs to see what I have included and what else I have in the collection that does not appear here or on the web site. Now that I look again I realise how weak the Lilac looks in comparison to others I have posted, so I applied myself to a part-finished painting to give my confidence a boost and the result is here.

Hollyhocks: Fabriano Extra White 300gm
26 x 36cm


The original painting was slightly larger than this, but I did want it to fit comfortably into a 20x16 frame as this seems a popular size at exhibitions. I had painted the tops of the hollyhocks with their unopened buds, but the framing would have had the mount cutting right across the lower left flower and this seemed a bit 'uncomfortable'. I played around with 2 L shaped pieces of mount board and even rotated them slightly to make the central stem go very slightly across the page, and although I would have liked to include the buds, I felt that this was the best compromise.
For my mounts I always use antique white mount board by Colourmount, with a slight weave pattern to the surface, and I then use a variety of white frames either commercial or home-made. I seal the backs of the frames with heavy-duty gummed paper, as I have yet to find a sticky backing tape that stays in place. It only need one corner to lift slightly and it plays havoc with the bubblewrap bags in which the paintings are stored.

Saturday 9 April 2011

Summer's Comming

This week's club subject was 'Village Fete'. One of those subjects where I do not think I could get away with painting a pot of flowers, so it was a case of looking for something that avoided people, animals and too many  buildings. Although I do accept that this sort of compulsory programme does take you out of your comfort zone and pushes you in to subjects that you would normally avoid like the plague.
Found this picture in the google images library, and as an ex textiles teacher with an interest in pattern and design, thought it had great shape and colour. Was undecided about whether to mask out the ribbons before painting the sky, but in the end went for careful painting of each section, remembering to blot out the clouds in such a way as they continued behind the ribbons. Think it works ok, so thanks to whoever took the photo, no name was given so I cannot acknowledge the original 'artist'.

Such lovely weather sent me out into the garden this weekend, and we have a lovely Lilac tree in flower at the moment, The colour and perfume are lovely at this time of year as they promise lots of floral goodies to come as the weather warms up.
For someone who paints flowers as often as I do, I never really feel intimidated by a floral subject, but these blooms were really something else. I have talked before about what to put in and what to leave out in a previous blog, which is a challenge in itself. Add to that, really bright warm sunshine and a good breeze, so that nothing stays wet long enough to get a decent wash, and I wished I'd never started. I did keep going, as I have fond memories of Lilac, as it was the subject of the first painting I ever sold above club level, and I remember how it felt to know that a total stranger wanted to live with one of my paintings.....heady stuff! It will not get framed, but I might put a mount around it to include in the 'bargain' browser!


Friday 1 April 2011

Creative Thinking


Club subject this week was Spring Flowers. After the high winds over the week, the pansies were all that was left in the garden, suitable for taking with me. I was pleased enough to finish it when I got home. Hope you enjoy looking.

Its funny the things you take for granted, and when they cease to be, you do not quite know what to do about it.
I have always, since way back, produced my own greetings cards. To start with, it was just for family and friends birthdays, and Christmas. It grew a bit when I started going to craft fairs and selling the cards, and although there was no great profit, I always enjoyed chatting to the customers and it kept me busy.
With the advent of the annual painting exhibitions, I have been able to sell quite a few more and they are a useful advertising tool. Finding the right paper and printing format has been a case of trial and error, but producing the images has been a simple case of scan in the image, adjust it slightly in Photoshop, add a border and print onto the card.
With the need to start planning for Wells in the summer, I have been looking at this years work to see what might print well. I buy white gift boxes and package the cards in a way which makes them suitable as gifts, or they can be framed separately for anyone who cannot afford to buy a painting, or just as a set to send out to friends, as they are a real bargain at £10 for a box of 8 A5 cards and envelopes. Every year I have sold more and more boxes, starting tentatively with half a dozen to see how they went and last year selling 20 boxes in the space of 5 days. This year I have ordered 30 boxes and we will see if we can sell them all!

There is, however, a problem! I have always painted on 'not' paper, and in the printing process the texture of the paper has never had a negative effect on the reproduced image. This year however I have bought quite a lot of 'rough' paper and produced some lovely images, but when I scanned them into the pc, the texture of the paper is quite evident and spoils the painting in the printed form.
I have spent ages in Photoshop trying to remove the texture of the painting to no avail, and thought that I would have to resort to re-using some of my older paintings for this years selection. Whilst making my mother's Mothering Sunday card, I reduced the size of the image to see if that would help, as you obviously lose detail when you do that, and then I enlarged the 'canvas' to get it back to the right size to print, without realising that it was set onto a coloured setting.
The resultant card set me thinking that this was an easy way to overcome the grain problem and with no more ado, the chosen images have been produced in this format, which I hope will sell well. If not, then friends and family will get a box each added to their Christmas parcel!!
Four of the eight resulting designs are below for you to see what you think.